अगर आप blogging करते है और अपने blog पर better article share करते है तो आपको अपने blog की हर post में अपना name photo और अपनी details add करनी चाहिए जिससे visitors आपको पहचाने और ये जान सके की इस blog का author कौन है। आज इस post में मैं आपको इसी के बार में बताने वाला हूँ की blog की हर post में author box कैसे add करते हैं।

अगर आप चाहते है की आपके visitors आपको पहचान सके और उन्हें पता रहे है की वो किस की website या blog पर activate है इससे आपका name भी होगा और लोगो को आपकी website को याद रखने में भी आसानी होगी। Blog की traffic बढ़ाने में भी help मिलेगी और भी बहुत से फायदे है blog में author box enable करने के so आइये जानते है।
Blogger की सभी Post में Author Box कैसे Add करें?
Step 1
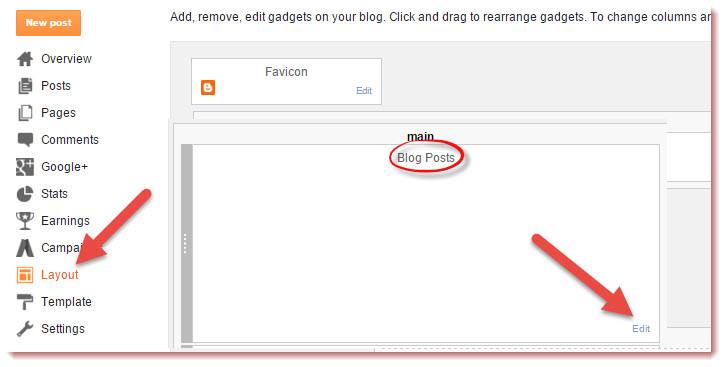
सबसे पहले अपने blog के dashboard >> Layout पर जाइए।
 1. layout select कर लीजिए।
- Blog posts widget पर Edit पर click कीजिए।
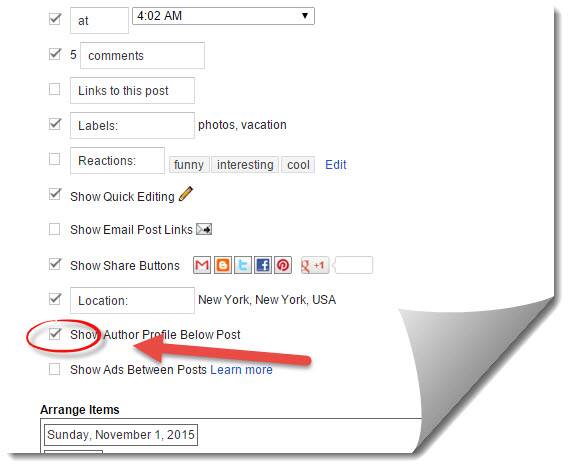
- अब एक new popup window open होगी उसमे आपको show author profile पर टिक करनी हैं।
Step 2:
अब एक new page open होगा उसमे show author profile के सामने टिक कर दीजिए।
- Save पर click कर save template पर click कर दीजिए।

Step 3:
- अब अपने blog के dashboard में चले जाइए।
- Template >> EDIT HTML पर click करें।
- अब code box में कही पर भी click कर और Ctrl+F button दबाकर ]]></b:skin> search कीजिए।
- ]]></b:skin> की जगह ये code paste कर दीजिए।
/* css Author Box start by https://www.supportmeindia.com */
.articleAuthor{overflow:hidden;margin-bottom:10px}
.authorContent{overflow:hidden;background:#f1f1f1;padding:0;margin:1px;margin-bottom:0;border-top:2px solid #e9e9e9;}
.authorLeft{overflow:hidden;float:left;margin-right:10px;}
.authorLeft .authorAvatar{overflow:hidden;}
.authorLeft .authorAvatar img{background:#f1f1f1;display:inline-block;}
.authorDetails{overflow:hidden;margin:14px 0 0 0;}
.authorDetails h2{font-size:12px;color:#222;font-weight:400;text-transform:uppercase;}
.authorDetails h2 a{color:#4db2ec;background:#f1f1f1;padding:4px 8px;display:inline-block;font-size:15px;margin-left:5px;border:double #f1f1f1;}
.authorDetails h2 a:hover{color:#71c5f6;background:#f1f1f1;}
.authorDetails span{display:block;padding-top:3px}
.articleAuthor .authorContent p{color:#222;line-height:20px;margin:0 10px;font-size:15px;}
/* css Author Box start by https://www.supportmeindia.com */
Background:#f1f1f1 की जगह आप अपनी पसंद का color change कर सकते हों।
Step 4
-
- अब ये code <data:post.body/> search करें।
- <data:post.body/> के नीचें ये code paste करें।
<div class='articleAuthor'>
<div class='authorContent'>
<div class='authorLeft'>
<div class='authorAvatar'>
<img alt='' class='avatar avatar-120 photo dontshowit showit' height='120' src='https://3.bp.blogspot.com/-N2mOOAsAbMI/Vdxr_5yH76I/AAAAAAAABbU/eMdnoOf6DrU/s1600/jume%2Bdeen%2Bkhan.png' width='120'/>
</div>
</div>
<div class='authorDetails'>
<h2>
About Author<a href='https://https://www.supportmeindia.com' rel='author' title='Admin'>your name</a></h2>
</div>
about you
</div>
</div>
- src के सामने वाले link की जगह अपनी photo के link paste करो।
- supportmeindia.com की जगह अपनी website का URL डाल दीजिए।
- about us की जगह पर अपनी details लिख दीजिए ।
- Code set करने के बाद Save Template पर click करें।
अपने Photo का Link पता कैसे करें?
- New post लिखने के option पर जाओ और post में अपना photo upload करो।
- अब Compose/HTML option में से HTML पर click करें।
- अब coding में 2 तरह के link होंगे href और src आपको src के सामने वाला link use करना हैं।
Note:- <data:post.body/> code blog की template में कई जगह पर होता है अगर trick काम ना करे तो <data:post.body/> के नीचें code paste कर के check करें।
अब एक बार अपने blog की किसी post को open कर के result check करें आपको कही पर कोई problem होती है तो comment में अपनी problem पूछ सकते हों।
I hope आपको ये post अच्छी लगी होगी अगर हाँ तो इस post को social media पर share जरुर करना।


Mr. I
Asslam o Alaykum, Jumedin Bhai,
Miane aapke steps ke anusar blogs par ye codes add kiye. or author profile bhi s\how ho rha hai but Author detail Author picture ke right side me aane ki bjaay niche aa rahi hai. check >> hindihealthbox.blogspot.in/2016/08/top-10-constipation-home-remedies-in-hindi.html
muje wo detail right side me rakhni ho to kya karna hoga ?
Jumedeen Khan
W/A
maine check kiya hai iske liye aapko author p ke css code me font-style: inline code add karna hoga.
akshay soneshwar
hello mujhe ye janana hai ki ye URL kya hai apni website ko Google me jodne ke liye URL bol rha hai aur mai apni blog par kuchh bhi post karta hu to error 404 btata hai ise kaise thik kare
Jumedeen Khan
Hum jab kisi site ko open karte hai to upar url box me jo link hota hai wo us site ka ul hota hai jaise mer isite ka ulr hai https://www.supportmeindia.com
yash
Sir
Aapki website me jese post is tarha she aati hai…
https://www.supportmeindia.com/blogger-ki-har-post-me-author-box-enable-kaise-kare/
Likin meri website par…
xyz.blogspot.com/2016_11/android_ka…
Ise bina date ke kese set kre..
Jumedeen Khan
Blogger url me se hum date remove nahi kar sakte.
ramesh kumar sharma
namskar sir,
aapke bataye step ke anushar (abot us ki jagah apni dtails likhe.) yah opction bhi nahi mila sir kaha apni dtails likhe.
next sabaal hai hamara sir mai ek esa blog banana chahata hu jispar (letest job, result, answer key, cutt off etc. ke bare me blog banana chahta hu . sir step by step jankari deve.
thanking you.
Jumedeen Khan
about us yani apne bare me likhna hai. jiase maine post me btaya hai. ha bana sakte ho ye post pado Blogspot Par Free Blog Banane Ke Bad Kya Kare Full Guide
ramesh kumar sharma
namskar sir,
aapke bataye step ke anushar mane Blogger Ki Har Post Me Author Box Kaise Add Kare? kiya likin ye mesege dikhata hai.(Error parsing XML, line 1530, column 128: The value of attribute “src” associated with an element type “img” must not contain the ‘<' character. Hide notification) kya kiya jaye sir.
thanking you.
Jumedeen Khan
aap post me btaya hua jo code blog template me add kar rahe ho. use sahi se add karo. ‘>’ check karo kahi par duable ho raha hai.
ramesh kumar sharma
namskar sir,
aapke bataye step ke anushar mane Blogger Ki Har Post Me Author Box Kaise Add Kare save karte hai tab ye messege aa raha hai (Error parsing XML, line 1417, column 2: The value of attribute “src” associated with an element type “img” must not contain the ‘<' character.)
aur template box me ( ) jo sabad hai vo select dikha rkha hai aur esme / ke baad curser hai ye just scr ke samne apni foto ka link diya thaa. uske niche wali line hai.
thanking you.
Jumedeen Khan
Ramesh aap code ko template me sahi add nahi kar pa rahe ho. isliye error aa raha hai. iske liye aapko blogger ki coding ki jankari honi jaruri hai. error me bta raha hai ki “>” me problem hai to use solve karo.
raju
sir mera blog Check kar Ke Dekhiye Author Profile Samne aa raha Hai pl Help sir
Jumedeen Khan
blog dashboard>>settings>>Reading par jao or Front page displays me Your latest posts ke samne tick karke setting save kar do. post show hone lag jayegi.
raju
sir esa koi option hi nhi hai hamare blog me mera samsya blog open kar ke dekh lijiye ek baarpl sir
Jumedeen Khan
Aap WordPress user ho, right. WordPress me yahi option hai ache se check karo.
mayank thapliyal
vo bi nahi aara .. plz help kar do
Jumedeen Khan
Mai jitni help post me kar chuka hu. usse jyada nahi kar sakta. aap hoda dimag lagao to kar sakte ho.
mayank thapliyal
mere usme ]]< skin nahi h ni hora plz help
Jumedeen Khan
]]< skin nahi hai to sirf skin code search karo.
Romeo
Tank You But me ke niche code paste kar raha hu par working nhi ho raha yaar
Romeo
aap ka template link do me dowload kar lugga
Jumedeen Khan
google me mythemeshop ribbon likh kar search karo.
Romeo
muje aap ke site ka tempalet backup chaiy
Jumedeen Khan
meri site ka template aap mythemeshop se download kar sakte ho.
Jumedeen Khan
Aap jo template use kar rahe ho wo template mujhe contact us page par send karo, mai aapko author box hata kar deta hu.
Hindi Love Shayari 143
Sir pleas help me
Muje athor profile ko rimov karana he
Meri site me uski jarurat nahi he
Or laylot me se post addit karaka hu or click mark nikal deta hu fir bhi dami tex vala oppston aata he sir muje pagal kar diya he athor profile ne se ak baar nikak jaye to aap ka bahut bahut sukariya
Jumedeen Khan
ke niche code paste karna hai.
Deepak Shrivastav
second result k upar ya fir side me code ko add karna hai ??
Jumedeen Khan
aap se nahi hoga, mai aapko author box set karke dunga, so no tention
Amit singh
sab kuch ahi se set kar diya layout me v author box ko enable kar diya.phir v post ke niche author box nahi show ho rha hai.
Jumedeen Khan
agar ]]> code nahi hai to sirf skin likh kar search karo or second result ke upar code paste karo
Jumedeen Khan
code bilkul sahi hai, aap blogger ke dashboard>>layout me ja kar posts widget par ja kar author box enable kare.
Amit singh
aap ke code me kahi koi problem hai save nahi ho rha hai error show ho rha hai.
Amit singh
mere template me ]]> option hai he nahi.jankaaarinetki.blogspot.com
aap dekhe isme author box add ho skta hai ya nahi.