Is post me aapko Windows Computer Me PUTTY Install Karne Ki Hindi Jankari Milegi. Is PUTTY instalation guide ko follow karke aap aasani se Windows 10, 8, 7 etc. me PUTTY application download and install kar sakte ho.
PUTTY Kya Hai? PUTTY ek free and open-source terminal emulator, serial console and network file transfer application hai. Ye several network protocols, including SCP, SSH, Telnet, rlogin and aw socket connection support karta hai.
Iski help se aap apne computer ko web server se connect kar sakte hai. Example, aap digitalocean server ko PUTTY se connect kar access or manage kar sakte ho.
Computer Me PUTTY Install Kaise Kare
Apne computer me PUTTY install karne ke liye aapko iska installation package download karna hoga jo aap internet par iski site se kar sakte ho. Agar aap 64-bit computer use karte ho to aapko PUTTY ka 64-bit version hi install karna hai.
2025 be ad mostly computers me 64-bit processor hi hota hai fir bhi aap ek bar confirm kar le to achha hai or agar aapka CP 32-bit hai to aap iska 32-bit version hi download kare.
PUTTY Download Kaise Kare
- Sabse pahle aap Download PUTTY website par jaye.
- Ab Package file section me ja kar Windows Installer select kare.
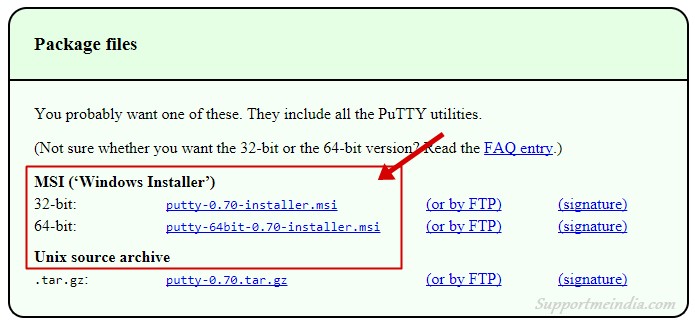
Aap jo opearating system use karte hai wohi choose kare. 64-bit hai to 64-bit ya 32-bit hai to 32-bit wala package select kare.
PUTTY Install Kaise Kare
Ab aapko PUTTY configuration and installation setting up karni hai.Jab downloading complete ho jaye to file ko open kare.
Step 1:
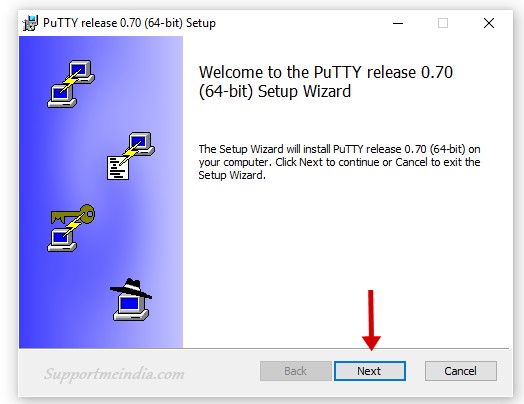
- Ab aapke samne PUTTY welcome message show hoga. Next par click kare.
Step 2:
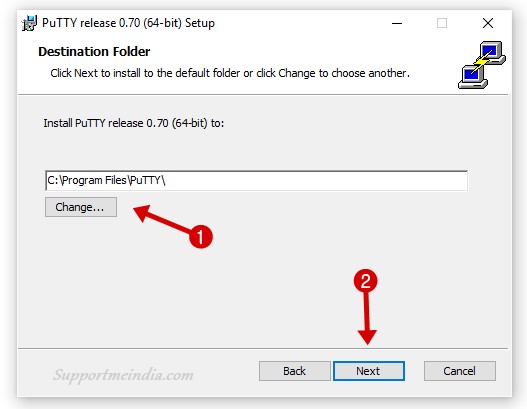
Ab windows installer aapse destination folder ke liye puchega jisme aapko software install karna hai. I think default location hi best hai.
- Destination folder choose kare.
- Next par click kare.
Step 3:
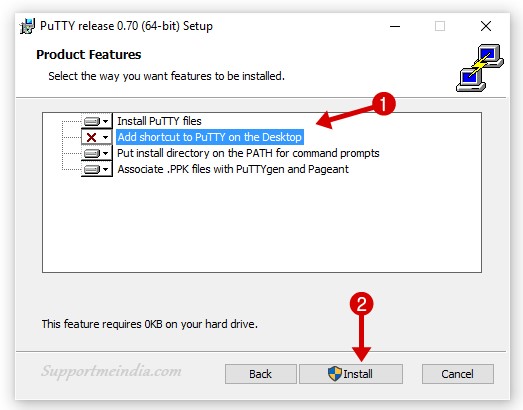
Ab installer product feature select karne ke liye kahega. Agar aapko software installation ke sath hi computer desktop screen par shortcut chahiye to Add shortcut to PUTTY on the Desktop option select kare.
- Select Prduct Feature kare.
- Install button par click kare.
Step 4:
Ab user account aapse software install karne ki permission mangega. Yes option select karte hi PUTTY install hona shuru ho jayega or next kuch hi seconds me ye install ho jayega.
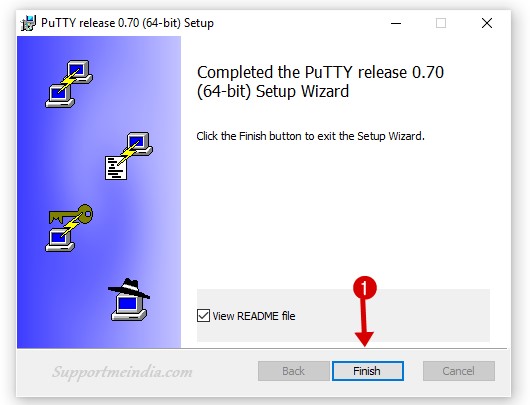
PUTTY successfully Install hone ke bad Completed screen display show hoga. Isme Finish par click kare.
Congratulations! aapne apne windows computer me successfully PUTTY apps install kar liya hai. Isi tarah aap baki windows like windows 10, windows 8.1, windows 7 me PUTTY install kar sakte ho.
PUTTY Use Kaise Kare
Ek bar PUTTY install karne ke bad aapke dimag me ek sawal aayega ki iska istemal kaise karna hai. Chaliye main aapko iske bare me details se bta deta hau.
Step 1:
Sabs pahle aap apne computer desktop PUTTY name ke shortcut par click kare.
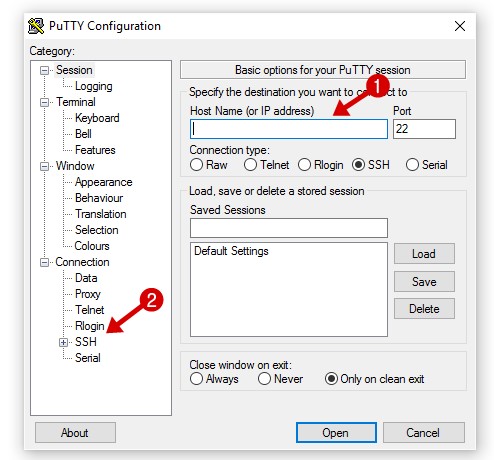
- Hostname (or IP address) me apna server IP address add kare.
- Ab jis method se server connect karna hai wo select kare. SSH Key se karna hai to SSH select kare.
Step 2:
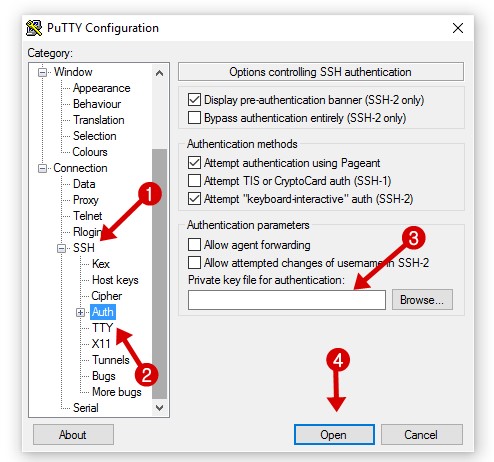
- SSH select kare.
- Authority option Auth ko open kare.
- Browse par click kar apne computer me se SSH Key select kare.
- Open button par click kare.
Step 3:
Ab PUTTY console open hoga. Jisme aap apne server username se log in kar sakte ho.
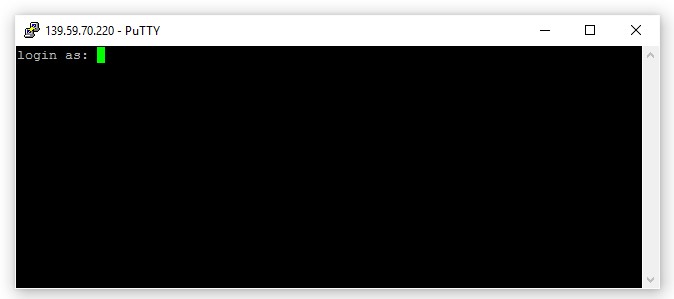
Is tarah se aap apne windows computer me PUTTY install kar apne cloud hosting server ko access and manage kar sakte ho.
Ye bhi padhe,
Agar aapko ye tutorial pasand aaye to ise social media par other blogger or website owners ke sath share jarur kare.


Kamal
Very useful post bro