CDN (Content Delivery Network) website page speed imporve karne ka sabse best tarika hai. Is post me aapko KeyCDN Ko WordPress Blog Me Setup Kaise Kare ki step by step with screenshot hindi jankari milegi. How to Set up KeyCDN on WordPress in Hindi?

KeyCDN top CDN provider me se ek hai aur iski service bhi bahut achi hai. Ye worldwide aapki site ko fast laoding banata hai. Main already iske review article me iske bare me puri details share kar chuka hu,
Aap ek bar is post par ja kar iske bare me jan le aur agar aapne abhi tak KeyCDN buy nahi kiya hai to is link se buy kar le, is link se buy karne par aapko $10 free credit milega. Sath hi aapko 30 day ka free trial bhi milta hai.
KeyCDN par signup karne ke bad aap niche di gayi guide se wordpress website me keycdn setting up kar sakte ho.
KeyCDN Ko WordPress Blog Me Kaise Setup Kare?
Main yaha wordpress site me cdn setup karne ki step by step guide with screenshot share kar raha hu taki aap easiliy cdn setup kar sako.
1. Create KeyCDN Pull Zone
Sabse pahle aapko KeyCDN dashboard par login kar ek pull zone create karna hai. KeyCDN Pull Zone kaise create kare?
Step 1:
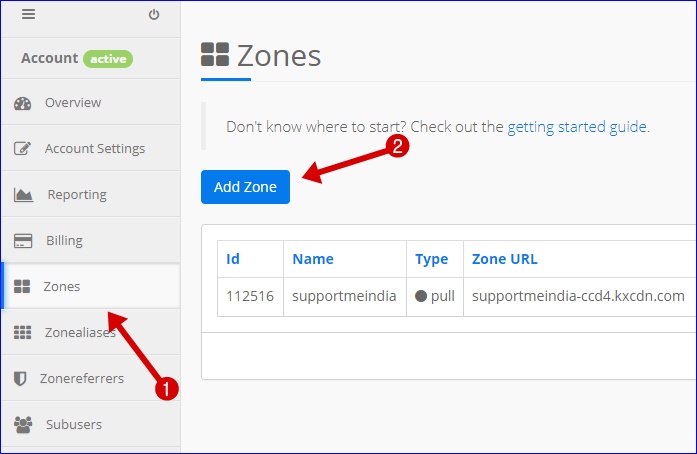
- Left side menu me Zones par click kare.
- Ab Add Zone button par click kare
Step 2:
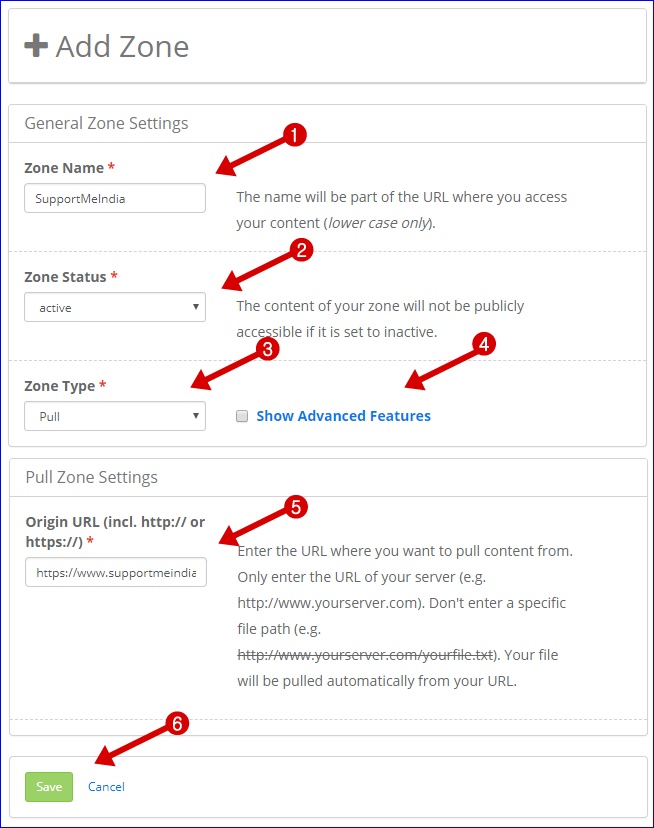
- Zone Name: Apni site ka name ya koi bhi name add kre.
- Zone Status: Active select kare.
- Zone Type: Pull select kare.
- Show Advanced Featured: Ye feature custom SSL setup ke liye hai, agar aapki site par http enable nahi hai to ise untick hi rahne de. (Note:- iske bare me niche alag se jankari di gayi hai, aapki site https se open hoti hai to aap ise setup kar lena.)
- Origin URL: Apni site ka full URL add kare.
- Save: Setting save karne ke liye save button par click kare.
Advanced Featured Settings
KeyCDN zone advanced settings me multiple settings me main aapko screenshot ke sath sahi se bta deta hu.
1. Common Zone Settings
- GZip enable kare.
- Aapko CDN cache-control yani expire date add karni hai.
- Free Let’s Encrypt choose kare aur agar custom ssl certificate hai to custom select kare SSL certificate key and private key add kare.
- Force SSL enable kare taki URL HTTP to HTTPS redirect ho sake.
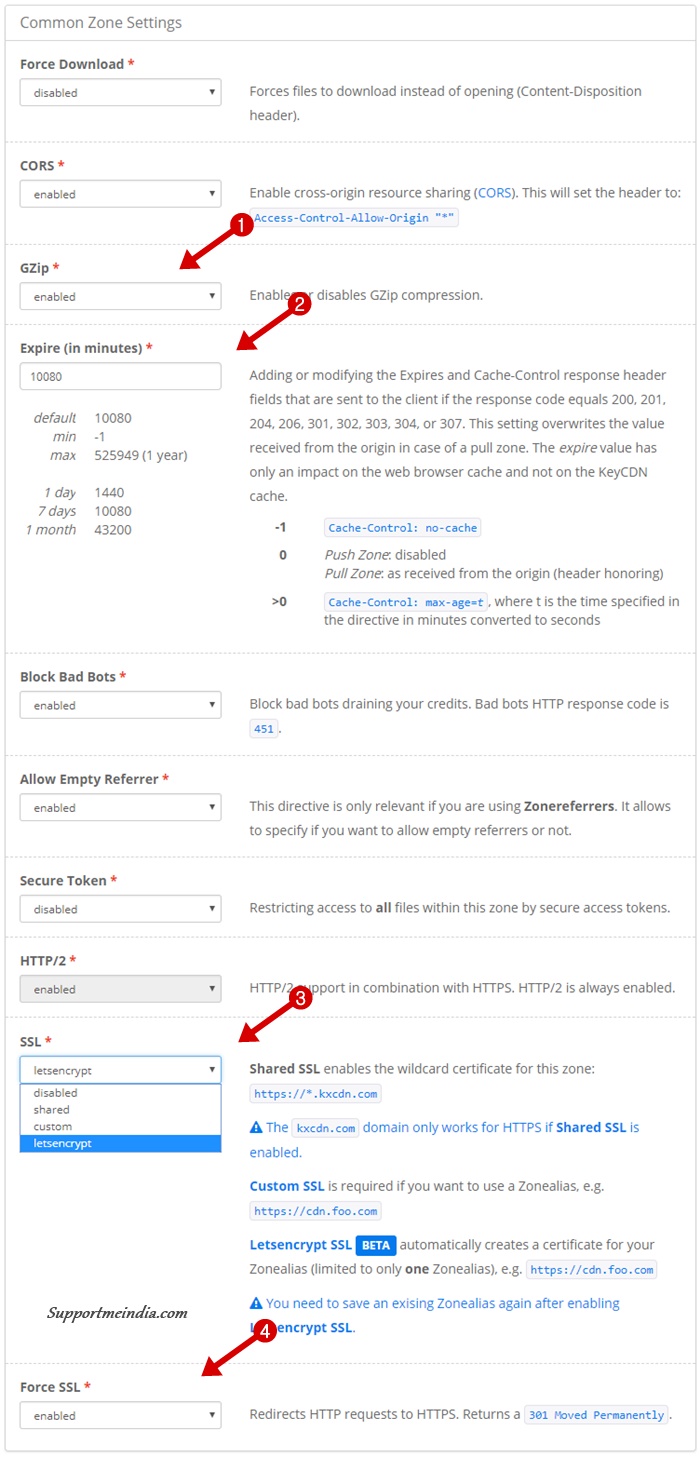
Baki all settings ko default rahne de, koi confusing ho to screenshot me dekh le.
2. Pull Zone Settings
Yaha aapko bas 2 settings karni hai baki all settings ko default hi rahne de.
- Origin URL me apni site ka homepage url add kare.
- Forward Host Header ko enable kare taki cdn.example.com url aapki site ke main URL par redirect ho sake.

Finally, Save button par click kar settings save kare. Ab thoda wait kare, pull zone ko activate hone me thoda time lagega. Activate hone ke bad hume wordpress blog me cdn enable karna hai.
Note:- Agar aap custom ssl use karte hai to aapko ek cdn.example.com type se zonealias bhi create karna hoga taki custom ssl se file open ho sake. Sath hi aapko
2. Install CDN Enable Plugin
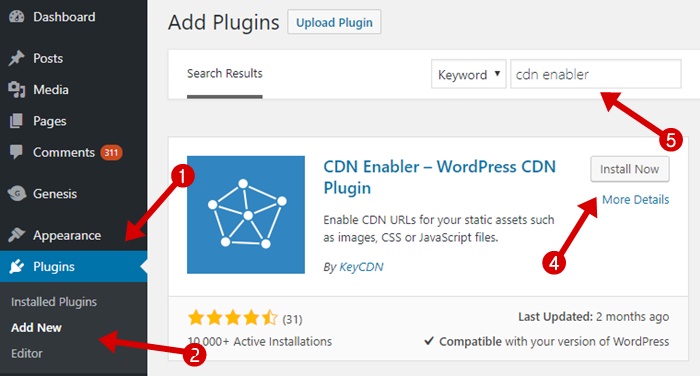
WordPress me cdn enable karne ke liye hum KeyCDN ka hi official plugin CDN Enabler – WordPress CDN Plugin use kaenge. Is plugin ko download kar install kar le.
Aap WordPress dashboard >> Plugins > Add New par jaye aur search box me “cdn enabler” type kar plugin install kar sakte hai.
Aap chahe to w3 total cache, wp super cache, wp rocket etc. plugin se bhi cdn enable kar sakte ho.
3. Enable CDN on WordPress
Ab aapko wordpress me cdn enable karna hai. Iske liye CDN enabler plugin ki setting me jaye.
WordRess CDN Enabler Plugin Settings:
WordPress dashboard >> Settings >> CDN Enabler option par jaye aur niche btaye step follow kare.
- CDN URL add kare.
- Relative pah ko enable kare.
- Agar aap CDN ke liye SSL use kar rahe hai to hi is option ko enable kare.
- KeyCDN API key aur KeyCDN Zone ID add kare.
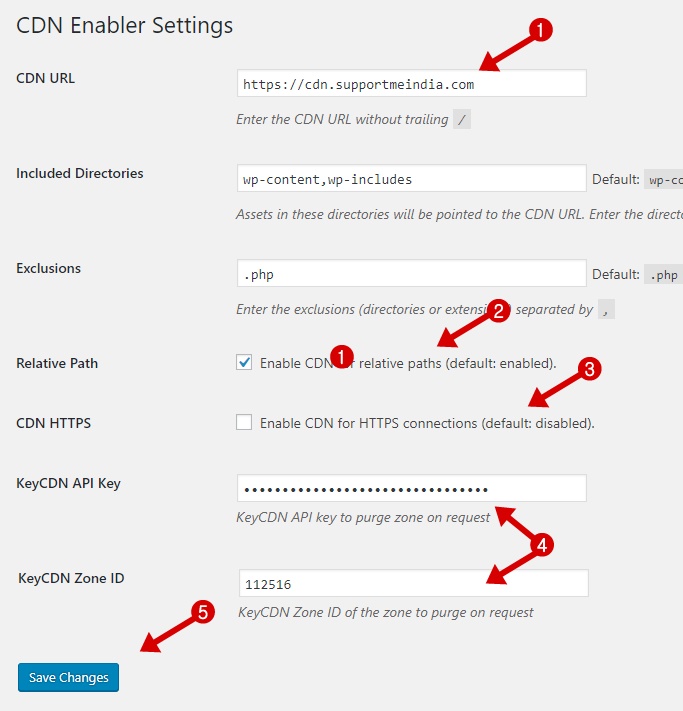
KeyCDN API KeCDN dashboard >> Account Settings >> Authentication par milegi me Aapke upar jo Zone create kiya tha uski ID add karni hai.
Congratulations! aapne successfully wordpress me keycdn cdn enable kar liya hai. Ab aap apni site ke kisi page ko browser me open kar uska source code check kare aur dekhe ki files cdn url se open ho rahi hai ya nahi.
Ye bhi padhe,
- Cloudflare CDN Se Blog Ko 200% Fast Loading Kaise Banaye
- CloudFlare Free CDN Use Karne Ke Fayde or Nuksan (Pros and Cons)
Agar koi problem ho to aap niche comment section me puch sakte hai. Post achhi lage to ise share jarur kare.



pradeep
#Jdk sir… Keycdn use करने के बाद मेरे site पर कभी-कभी Upload Post Images + Featured Images Desktop और Mobile दोनों में Show नहीं हो रहा है …….. साथ ही Site Speed Slow Open होती है ……. इसका क्या Reason हो सकता है ……. क्या ये Nginx Server में Enable gzip Setting करने या Keycdn use करने से या इसके अलावा मुझे कोई और Setting करनी पड़ेगी …… इस Problem पर कोई Article Post करे, सर…
Reminder: *New Article* Improve WordPress Performance With Nginx FastCGI And PHP 7.2-FPM On Ubuntu18.04 LTS in Hindi
Jumedeen khan
Keycdn ke proper work karne ke bad hi blog me add karna chahiye,agar aap cdn ke liye free ssl use kar rahe ho to wo all browser support nahi karta, isiliye mobile me file load nahi ho rahi hai. Tnx, I will write quickly.
pradeep
#Jdk Sir, मैंने Images Uploading Problem Solve कर लिया….परंतु VPS relevant, Site Speed काफी Slow है ……Speed Boost के लिए site पर Optimize Image, make 301 Redirection correctly और Host fonts locally का कोई Post/ Article बताये …
Jumedeen khan
Digitalocean, Vultr, Linode par iske articles mil jayenge.
Scott
Very Nice Post, I learned a lot through it. Thanks for posting.
Rushikesh Sonawane
Sir sabse pahale yah post kafi helpful hai. Kuch sawal hai…
1. Sir jyadatar hosting ke database center Bangalore me hai. Dusra keyCDN ka data center bhi isi city me hai. Mera kahne ka matlab India me hosting+CDN ek hi location me hai. To yah indian traffic ke par kaise speed badha sakata hai.
2. Second thing kya KeyCDN par trial pack khatm hone ke baad, $49 ka credit add karna padta hai.
Jumedeen khan
1. Aapke server location par aapki site already fast load hoti hai, CDN all world me site ko speed up karta hai. Look, KeyCDN Review
2. Yes, lekin khatm hone se pahle karo taki aapki site down na ho.